Tuesday, June 21, 2011

Lacy Panel Skirt with Waist Tie

I got a little bored this weekend (what's new, right?) and decided to see if I could make something without a pattern again.  I wanted to brainstorm a little bit, so I got out a piece of paper and a pen and came up with this:
Which eventually turned into this:

I took photos so I could post a tutorial if it worked.  It did!  So happy and here you have it....

Supplies-
Fabric:   Color A- enough for a 10" x 14.25" piece
               Color B- 1 yd.  (you'll have leftover) out of this,
                              cut two pieces 14.25"w x 31.5" l
               Color C- enough for 4 strips that are 2 1/2"w x 42"l each
               Lining Fabric- 2 yds.
Trim for the bottom.  75" (you will probably use about 72" but I always get a tad more than I need)
3/4" elastic
2 safety pins for threading elastic through casing
Thread in complimenting color
Scissors
Rotary Cutter and Mat
Acrylic ruler for cutting
Disappearing marker pen
Knitting Needle- helpful but not a "must have"

Step One- Gather up your supplies and make sure that your fabric and trim choices are what you want.
Step Two- Cut your fabric.  These dimensions I give will make a skirt that is 13.5" long from top to tip of lace when finished when using 1.75" lace.  My lace was about 1.75" from top to bottom, minus seam allowance of 1/8".  Be sure to adjust your lace measurement depending upon the trim you use if you want it to be exact.  (I'm an "eyeballer" myself.)  If you want a longer skirt, add or subtract the length you want on top of the 13.5" to the width of colors A & B.
From Color A- cut a piece that is 14.25" w x 10" l 
From Color B- cut two 14.25" w x 31.5" l pieces
From Color C- cut four 2 1/2" w x 42" l strips


Step Three-  Take your piece of Color A (the middle panel) and fold it in half, right sides together.  Using your ruler and disappearing fabric pen (I used a ballpoint on this one b/c the dot is super tiny and will disappear into your seam), mark 2.5" in from the fold.  Fold is on the right in this photo.


Then, line your ruler up from the dot you just made down to the bottom left corner. Cut.


When you open it up, your piece should look like this:
Step Four- Take one of your Color B pieces and place it flat on your cutting surface.  Line the top corner of Color A to the top of the right side of your Color B piece, and the straight edge of Color A should lie on top of Color B so that both flat sides (of colors A & B) line up.
Photo with Color A flipped back to show how it will lie on Color B

After making sure straight edges line up and both pieces are flat and smooth, lay acrylic ruler on top of Color A and cut Color B.

Step Five- Take your other piece of Color B and do the same thing to it on the opposite side.  (the left side of Color B.)

Your pieces should look like this now-
Step Six- Pin Color A onto left Color B, right sides together and sew seam.  Then do the same to the right Color B piece.
Pinned to Color B Sew 1/4" seam.


Step Seven-  Measure the length of your panel and cut lining fabric to the same length and width.
Step Eight- Pin trim onto bottom and stitch over stiching on trim.  (In my case, I had a 1/8" seam.)
Step Nine- Fold skirt right-sides together and pin edge, lining up trim.  Sew seam.  Then, fold up lining right -sides together and sew that seam as well.

Step Ten- Starting at the back seam, line the two seams on the lining and skirt together.  With right sides together, sandwich the trim in between the lining and the skirt, lining up the raw edges.  Pin together.

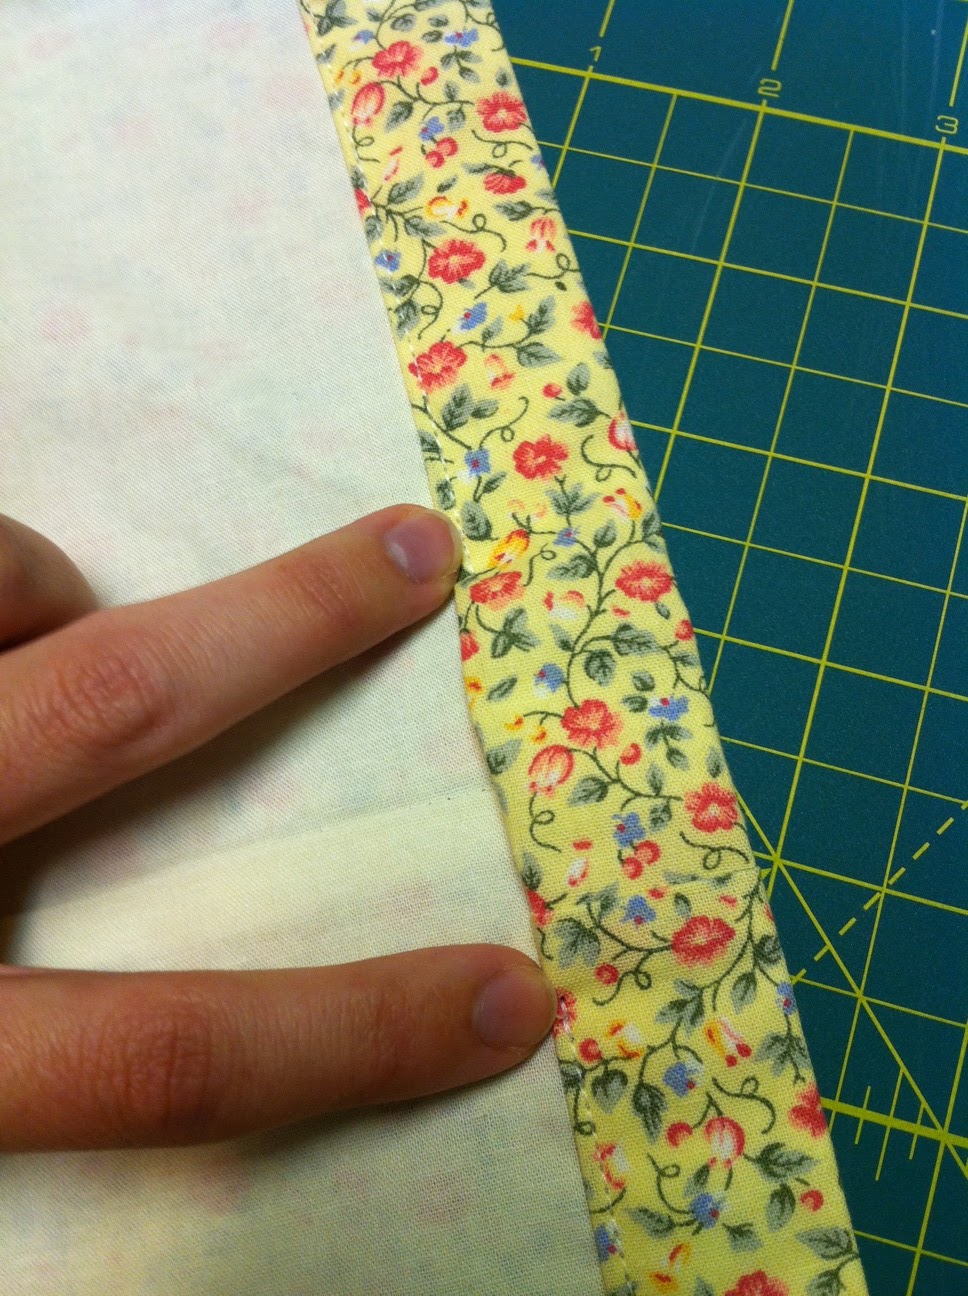
Then, flip the skirt so you can see the seam that you sewed on the wrong side of your colored (not lining) fabric when you sewed your trim to it.  Use that seam as a guide to stitch all three layers (main fabric, trim, and lining) together.
The seam is kind of hard to see b/c I used white thread.  Stitch down all three layers together.
Step Eleven- Flip up lining and press the skirt lining side out (right side of main fabric on ironing board, lace trim out.  Then, press top seam 1/2" down around the entire top of the skirt.  Flip down again another 1" and press again.  This will be the casing for your elastic.
Step Twelve-  I forgot to take pictures for this step since it was getting late and the kids were being well... kids.  Use your acrylic ruler and disappearing marker pen to draw a line down the inside of your lining fabric right below the main fabric of your elastic casing.  Then, flip up the pressed casing and cut 1/4" about the line on your lining fabric.

After you've trimmed the lining fabric, tuck everything back, repressing the casing folds if you have to.  Trimming the lining cuts back on bulk that you would have in your casing otherwise.

Then, starting about 1" away from the back middle seam sew as close to the edge of the casing (the blue line on the photo) as possible, stopping about 3 fingers away from completing the circle around.  Backtack at the beginning and end a few steps to make sure your stitches stay put.
Leave space to insert your elastic
Step Thirteen- Cut your 3/4" elastic the same size as your child's waist.  Pin one side of your elastic to the lining of the skirt, and attach a safety pin to the opposity side to help you thread it through the casing.  Thread through, being careful not to twist elastic as you pull.  I like to fold back my elastic edges before pinning so the pin won't rip through when you're pulling it through the casing.

After pulling it all the way through.  Make sure the elastic isn't twisted in any way and then sew it together back and forth a few times.  Push it the rest of the way inside the casing and sew the gap you left closed. 

Now you should have this-

Step Fourteen- Take two of your four strips of Color C and put them right-sides together, lining them up. Use your ruler to cut one side at a 45 degree angle.
Then, starting at the other end (the non-angled end), Sew 1/4" off the edge down the length of the strip, around the angle, and back up the other side.  DO NOT SEW THE SHORT END CLOSED.
Repeat with other 2 strips of Color C. Then, turn them right-side out.  A knitting needle helps.

Step Fifteen- Press your ties (Color C strips) flat.  Then, tuck the raw edge inside of itself and sew closed.  Repeat with other tie.

Step Sixteen- Sew short ends (the ones you just tucked inside themselves) of the ties together and then lining them up with the top part of the skirt, secure to one side of the skirt.

Now you can wrap the ties around and tie in a bow on the opposite side. 

Enjoy! 


Friday, June 17, 2011

Flower Petal Tutus and Headband

So I'm the kind of person who loves buying a ton of books and keeping them around for projects I'd like to do on a whim.  I have one book called, "Girl's World" that had a beautiful tutu with flower petals in between the tulle.  They also had flower headbands for girls, both of which, I just loved and wanted to try.

Never sewn a tutu before, so it was a learning experience.  The pattern in the book is pretty simple to follow.  A breakdown without photos (may make a step-by-step later, but since it's not my pattern [it's from the book] I'm not sure if I will do anything more than this description).....

     For the size XS/S that I used: cut two pieces of tulle that are 81" long by 54" wide each.  Lay the first piece flat and fold one long edge in to the crease running down the center, then fold in the other edge.  Next, you lay the second piece of tulle on top, lining up the creases.  Again, fold each edge in so each edge has 4 layers of tulle.  Then, flip all of the pieces from one side to the other side, (like closing a book) so you have 8 layers of tulle.  Pin in place along the crease edge and sew 1" off the crease. 

Trim the short edges so all pieces are even and run a piece of elastic that is the same size as the child's waist (the pattern calls for 1" shorter than the child's waist size, but I hate having things super snug and wanted a bit of growing room) through the casing you made by sewing next to the crease.  Line up the two short sides and pin together. 

Sew from the top of the casing to the seam of the casing (should be an inch if you kept to the 1" off the crease that I did).  Backstitch and repeat a few times to secure the elastic.  Then, leave 5" directly after the seam  along the short side NOT SEWN (so you can stuff goodies in the tutu later) but then sew all the way down the rest of the length of the tutu.  When you're done, flip it right side out (seams in), stuff whatever fun stuff you want in the outer (first) pocket of tulle.  After that, flip the tutu inside out (wrong side out) again, and sew that 5" area closed.  Add any embellishments to the waistband you want.

Scarlett's new dainty rose petal tutu:

After I made that tutu, I had so much fun that I wanted to make one for my cousin's daughter.  (Would that be a second cousin?)  So I made it again in purple.


These are QUICK to make.  Didn't take any time at all, so I still had a little bit of time before the kids got up from their naps/quiet time.  Flipping through the book, they had headbands with flowers on them.  I didn't follow their directions since they looked pretty easy. 

Supplies I used:
Smooth headband with no teeth
Silk leaves and flowers
Hot glue gun
Feather butterfly (totally optional)

I just glued the leaves on, positioned and glued the flowers, and threw on a butterfly.  I'm still undecided if this is cute or crazy.  I figured it's just for playtime anyway so who cares?

And the ensemble all together:

    My friend called her a "flower child" and I got a kick out of it.  Also laughed at her tummy in this picture.  Like a flower child with a beer gut.  Gotta love it!

Sunday, June 12, 2011

Hand Embroidered Matryoshka Booties and a Floor Cushion

Yippee!  It's a happy day when you finish a project you've been working on for awhile.  Yesterday, I finished the hand-embroidered felt baby booties I've been working on.  Wanted to post the finished product and put a general how-to.

Finished matryoshka baby booties:

Hand-embroidered felt matryoshka baby booties

Outer

Inner


Soles


    I got the idea for these booties when I was flipping through a few of my books.  The first book, Scandinavian Needlecraft had the pattern for the structure of the booties, and looking through my Doodle Stitching: The Motif Collection, I saw an embroidered matryoshka and fell in LOVE.  Always liked matryoshkas... not sure why, but they hold a special place in my heart.  I wanted to combine the two ideas and embellished from there.

First Step- Cut the pattern, two uppers and liners, and two soles and liners.  Liners were cut from fleece.  Soles and uppers from wool blend felt.  (Eco felt or acrylic felt won't hold up long, so use 100% wool or wool blend.)

Second Step- Embroider any design that you want on your booties and add embellishments.  Remember that the top part of the uppers will be bent down, so adjust your design accordingly.  You can also leave the uppers unbent if you'd like a more "boot-like" appearance.


 Step Three- Turn the booties inside-out with right sides together, liner on the outside (make sure that the "wrong side" of the fleece is on the wrong side of the felt (the part of the felt without the embellishments).  The fuzzy part of the fleece, or "right side" should be facing out right now.  Pin the back seam together.  Make sure everything lines up and is even.  It doesn't have to be pinned tight, in fact, I just pin it enough to line it up and leave it like that before sewing it together.


Step Four- Sew the back seam of the bootie, starting down by the sole, up to the top part of the uppers.  When sewing the back seam, you should be sewing through four layers.  Two layers of fleece lining and two layers of felt.  When you get to the top, start sewing the sides of the uppers... two layers... one fleece, one felt.  When you start sewing the top part of the uppers (the 2 layers), it may be easier after a few stitches to flip them right-side out.  When/if you flip them right-side out, I like to pin the tongue in place for stability.


Right-side out with tongue pinned.
Step Five- Once you've sewn all the way around the top and are on your last stitch, push the needle through the fleece into the space inbetween the felt and the fleece.
Then, flip the bootie over and stitch your knot in the space between the fleece and the felt.  If you knot on the felt, make sure that your knot does not go all the way through... that way, it won't be seen on the "right" side of the bootie.

Step Six- Pin the sole with its liner (wrong sides together so fluffy side will be to the inside of the bootie) to the upper.  Once pinned, stitch all the way around the edges, (starting at the middle of the heel) to the very last stitch...


 Step 7- On the last stitch, insert the needle through to the inside at the base of the back seam.  Place your knot as far down the seam as possible so it will be hidden.

And then you're done!


     Since I finished these booties yesterday, I needed something to keep me busy today.  I decided to start on the floor cushions I wanted to make using the tutorial from the blog, Living With Punks.  I cut the fabric for all of the kids' floor cushions, but only had enough time to finish Cam's today.  I figured I'd work on his first, since the little guys usually get catered to first.

Cutouts for all the floor cushions.
And the finished floor cushion:
     Now, it's just a matter of finishing the other two cushions before the small guys implode! 

Wednesday, June 8, 2011

New Romper and BIG Postal Delivery

Warning:  I went totally picture crazy with this post!  Be ready for a serious photo bomb.

This past Saturday was HOT, and when I say "hot", I mean topping 100 degrees.  WHEW!  We went to the playground for a little bit....


Cameron with Weiner Dog (A.K.A. "Weenie")


Scarlett in her hummingbird smocked top I made a few weeks ago.


Kai starting to look as red as the lobster on his shirt from the heat.

Weenie really is a "hot dog".  (Bad, I know.)


      After dealing with the heat, we all needed to cool down.  Mom sent us a Slip 'n Slide for the kids, so we set it up and let them have at it.


So I couldn't stop thinking about the fabric in my last order and wanted to get crackin' on a project ASAP.  There's a post on my sewing forum that shows all the work people have done lately and I was inspired by a romper that was posted.  Scarlett doesn't have a romper, so I figured it was time to remedy that.  On Sunday, I decided to knock it out.  The only problem was, our Internet was out because of the construction on the main road so I didn't have a pattern.
     I was a little upset at first, but decided to wing it.  I made pants just like the ones I did for the kimono pajamas, only shortened them and didn't add a contrasting band on the bottom.  Then, I made a longer version of the smocked hummingbird top (see playground pics above) without the ruffle and just sewed them together.  Voila!  Romper.  It worked out really well and gave her a lot of wiggle and jumping room. 


The house WAS clean earlier, but with 3 kids it doesn't last long.

Eating cucumbers from the garden while staring at the Sage flowers.

Kai chowing down on a freshly picked cucumber of his own. 

     After the romper, I got started on a new project.  Working on hand embroidered felt baby booties with matryoshkas.  Don't know what it is about matryoshkas, but I absolutely love them.  My kitchen table has been held hostage for the past 3 days on this project and I'm still not done.


Close-up of the unfinished matryoshka.

     While that project has been keeping me busy, a close friend of the family decided to downsize her craft goodies and sent me a shipment of epic proportion.  I don't think my new mail guy was too happy with me when he had to deliver this shipment to my door!

First part of shipment.


Second part of shipment with my separate fabric order on the very top.


     To top it all off, the cherry on the sundae was getting my fabric order in from my new favorite Etsy store, "brodyandma".  This is the same place I got my fabric from in the previous post.  LOVE her stuff. 

     That sums it up for today.  Friends of the family coming to visit tomorrow so it's time to get scrub-a-dubbin' on the house.  Will post soon with a matryoshka baby bootie update.

Saturday, June 4, 2011

New Fabric!

Been a few days since I last posted.  I took a nasty fall in the kitchen when the dishwasher overflowed, so I've taken it easy for the past few days.  Nothing like laying in nasty dishwater with busted ribs and a smushed toe to make you want to curl up in bed and hibernate. 

     However, I was so excited today when my new fabric order came!!!  Can't wait to get crackin' on some really neat projects.  I plan on whipping up a few dresses, maybe a bag or two.


     I also pulled out the embroidery machine that my mom gave me a few years ago.  Figure I'd take a stab at that and seeing if I can pull off anything that looks decent.  The machine is intimidating, though.  Looks like I could program some shuttle flights or something...


     I think I'm actually going to read the directions for this one.