Tuesday, December 20, 2011

Vegas and Ziplining

     It seems like vacations are rare in our family, but in the past two months we've made up for it.

    The first trip was back in November.  My mom and I have been talking for years about going to Vegas for a girls' getaway.  We finally made plans for the trip and left the day after Thanksgiving.

     It was my first time ever going to Vegas and I was so excited.  You'd be amazed at how much there is to do there.  A friend had told me that it's like a grown-up Disneyland and I have to agree.

     Mom and I did some shopping at the Venetian (that's my mom in the foreground) first. 

Found a great shirt that ended up coming home with me because I found it too funny to leave.

  And I was thrilled when we came to the Thomas Sabo store.  Thomas Sabo is a jewelry designer that I first discovered while we were living in Germany.  He makes some great stuff, but only has three stores here in the US... two of them in Vegas.  Yes, I hit them both.  :)

     The rest of that first night, we walked around to do some shopping and just see the city.


Shopping in Caesar's

Inside the Shops at Caesar's Palace.

Ceiling of blown-glass flowers.

The fountains at the Bellagio.

   The next morning, we were still pretty wiped, but not so wiped that we couldn't find some new friends to hang out with.  This here is Kotton Kandy.  Kotton Kandy told me to watch for him (her?) on the next season of "America's Got Talent"... so get ready, folks! 

First time I'd ever had a man yell, "Grab my titties!" 

    I don't know if I've ever laughed so hard in my life.

    My next friend was a bit fluffier and didn't require any weird posing.  I loved the Coca-Cola bear.
But then he ate my head...

   When we left the Coca-Cola store, Mom and I were pulled into a street performer's magic show.  After helping him out, we continued to walk around.


Jelly Belly Statue of Liberty

Statue Performer.  He was really cool.


    We eventually went to bed and woke up the next morning to head down to a fantastic buffet at Bally's.  I'm seriously drooling just thinking about it.   Will not torment you with pictures...  it would be too mean.  Crab legs, lobster, crepes, lamb, little miniature desserts, honestly, the best breakfast I have ever had.  Thanks, Mom!

     The rest of the last day was a bit more walking around and getting ready to leave.  I'm already wanting to go back so I can show Travis everything!

     The next trip was a ziplining trip that Travis set up for the whole family.  We left this past Friday to stay in a cabin at Banning Mills.  It's only about an hour and a half away from us so it was a really quick drive.  We waited at the main lodge to check in...
At the lodge.

Once we were checked in, we went to see our cabin. 
    It was built on a stilt frame, overlooking the creek.  A lot roomier than I had thought it would be.  I was really impressed.  It was a nice cabin.
    We went walking along the trails for a bit and then settled in for a nice, quiet evening.


     The next morning, Travis had signed Cam and me up for a ziplining tour.  Now, both Cam and I are terrified of heights... TERRIFIED.  It took a lot of guts for us not to throw up all over everyone.

     After getting our safety brief/instructional course, we climbed up on a rope bridge that connected to the first tower.  Once across, we climbed up the rest of the way to the first zipline.  I spent a while trying to coax Cameron off before I decided that maybe he should watch me go first.  He happily agreed.


Me trying to coax Cam off the tower.  (Cam in red, I'm in gray behind him.)


Better view of the first tower.


     Once I went, I talked to him over the instructor's radios and he followed about 30 seconds later.  After that first zipline, the rest were a breeze.  The course was about 10 ziplines in all, zipping from tree to tree in the woods.  It was so much fun!  We had some trail riders on the forest floor beneath us and it was funny to see the people gawking up from the forest floor and the horses just plodding along... not caring a bit.   (You could tell that the horses were veterans of the place.  People zipping over their heads was not a big deal.)

     After that, it was off to the spa while Travis took the kids to play miniature golf.  While walking back along the trails to get home, apparently Kai fell in the creek (not surprising) and was not a bit happy about it.  I got back from the spa to see his clothes laid out on the cabin porch to dry out.  Scarlett was thrilled to tell me about him falling in but Kai didn't look so happy about it.

    LOTS of fun!  For being a weenie about heights, you'd be amazed at how fast you get over it when zipping around like that.  I highly recommend it!

Tuesday, December 13, 2011

Poly Polar Bear Ornament

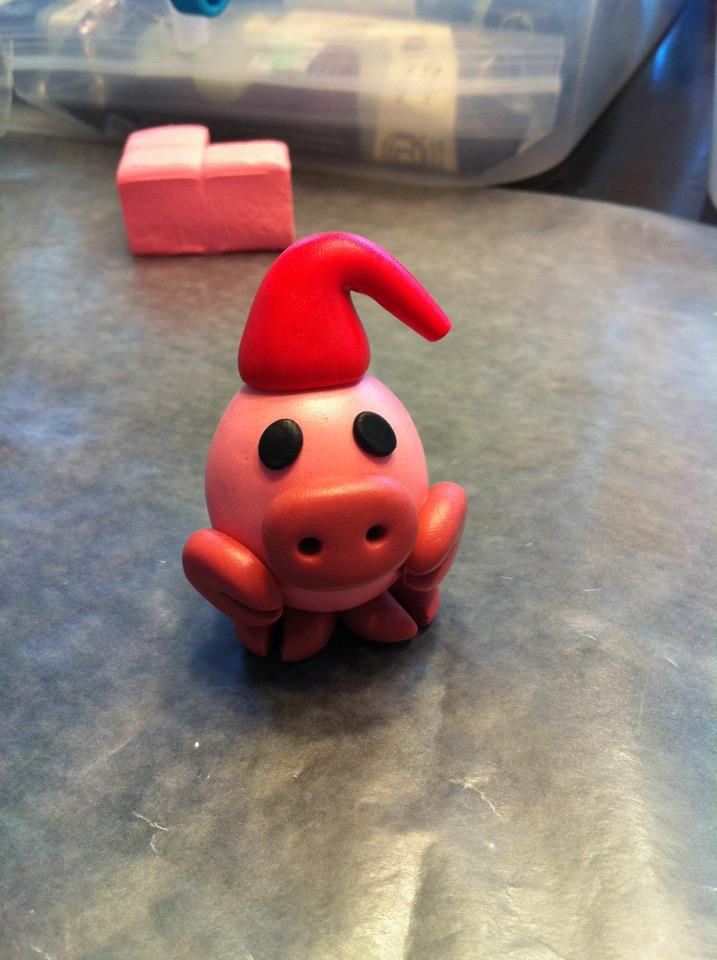
Last week, I made the poly pig for Cam's Christmas ornament this year, so I decided to knock out Scarlett's next.  I came up with this little guy:
Made him using Sculpey original (body and snowflake) and Sculpey Studio (eyes, foot pads, nose, scarf, and holly bunch).  Baked at 275 degrees for 25 minutes.  This picture is taken after he had baked and then had his eyes painted.  He's still not done yet, waiting on my Amazon order to arrive so I can paint the snowflake with glitter paint and possibly do some shading with soft pastels before I glaze him and add his hanging ribbon..  Not sure on the soft pastels, though... I've never used them before and it makes me a bit nervous.  Might just stick with painting a glittery snowflake.  :)

    A few other pics of him before he was baked/painted:


    I think she'll get a kick out of him.  We'll see!

Thursday, December 8, 2011

Poly Clay Christmas Piggy Ornament

 "Oink! Oink! Oink!"  In case you don't speak pig, that means, "Merry Christmas!  Time to make a piggy ornament!"  

   Polymer clay is a lot of fun to work with.  I was telling the ladies on my sewing forum that I have a short attention span, so short, easy projects always work best for me.  Poly clay ornaments are the perfect project when you don't have a TON of time, but still want to make something cute.

    Last year, I made some Christmas piggies for a friend's boys.  They turned out so cute that I wanted to try to recreate them for my kiddos.  I had already made hedgehog ornaments for my guys, so I decided to put it off until next (this) year.

    Here's the first!  Complete with tutorial.
Supplies- (many of these are optional or you can substitute with other things, I'll try my best to break it down)

     Before I get into the specifics, the clay that I prefer to use is Sculpey Studio.  It's more firm than some other polymer clays, which is good and bad.  Good because it holds its shape really well, but bad because it can make it more difficult to mold and/or blend.  I definitely recommend having clay softener on hand if you use this type of clay.  One drop goes a LONG way.  Don't use more than that without really needing it, otherwise you'll end up with slick, slippery, gooey clay.  Egh!  Like working with clay snot.

   Also, I have a little mini clay oven and silicone pad that I use specifically for baking my poly projects.  However, a regular oven works fine.  Just be sure that any cookie sheet you use for baking poly projects will NOT be used for food after.  Just designate one sheet for crafting and only use it for that purpose.  Before I had my craft oven, I used a regular oven, a cookie sheet (designated for craft projects, not food), and I would bake the clay on waxed paper placed on top of the cookie sheet.

Okay, now the list:
*= Optional or can be substituted with something else or worked around.

Clay- I used Sculpey Studio #6210 (Poppy), #6452 (Peapod), #6207 (Sedona), #6316 (Blush), and #6101 (Whipped Cream)
*Clay Softener- very useful with Sculpey Studio clay, but not 100% necessary.
Wax Paper- for sculpting on and/or baking
*Fine-tip Sharpie- for marking initials on the bottom of your ornament
Flexible Wire- for making the hanging loop
Ribbon
Paintbrush
White paint
Satin or Gloss Glaze- (I used Satin)
Clay "ball" tool- This looks almost like a pen with a little metal ball on the end, great for making perfectly round holes (i.e.- "nostrils") 
Wooden Clay tool for shaping- Mine has a thin edge for making lines/gouges, and a blunt edge
Wooden Clay tool for cutting- Used for trimming off excess clay and neatening edges
*Bake and Bond- I apply this to the wire loop for added security.  It's possible to make it without, but I like my stuff to be super durable.  With my kids, it needs to be...
Needlenose pliers- For twisting the wire loop
*Metal decorating tool-  I use this in a lot of different ways.  Smoothing, painting dots on the eyes, and using the fat, round end to shape the eye of the wire loop into a nice circle.  Can substitute other stuff for it, though, if needed.

Step 1- Shape the main part of the body into a smooth egg shape.  You'll also want to start preheating your oven at this point.  I used Sculpey Studio, so I preheated to 275 degrees.  If you use something else, follow the manufacturer instructions for the oven temperature.

Step 2- Make two little round balls out of the darker pink clay.  Slightly flatten them and use clay shaping tool to split each of them about halfway in to form trotters.

Step 3- Place egg shaped body onto trotters and push down firmly, but without squeezing body or changing its shape.

Step 4- Take darker pink clay and roll into a ball.  Flatten and shape into an oval.  Add your snout to the body.

Use your metal ball tool or other rounded object to make "nostrils".  Push all the way back into the body, this will ensure that the nose is stuck on really well.

Step 5-  Using the same method as Step 2, make two more trotters.  Add to sides of body, leaving a gap big enough for the wreath he'll be holding.

Step 6- Add eyes.  Roll a tiny bit of black into a slightly oval shape.  Attach using fingers or wooden tool.

Step 7- Roll red clay into a ball and then start applying pressure to only one side to thin it out and make more of a cone shape.
Fold over smaller end and cut off excess at the bottom.  Honestly, this part is all about "eyeballing" it.  Hold it up to your pig (without touching it) and see how much you should trim.  You can always trim more later, so don't hack off a huge chunk at first... keep trimming until it looks right.

Step 8- Attach hat to head.  Push down firmly, but without misshaping the hat.

Step 9- Roll out a long "worm" of white and wrap it around the base of the hat.  Make sure the line meets in the back.  Don't worry about blending the line yet, you'll do that later.

Use your wooden tool to flatten the white band all the way around, making sure that it's firmly attached.

Then add a white ball to the end of the hat.

Step 10- Roll out a very tiny dark pink "worm" that is thicker on one end than the other.  Then, loop it around so it corkscrews back on itself for a piggy tail.  (BTW, the next picture just looks horrible.  Like a curly pink booger.  I apologize.  Lol!)

Yes, that's a piggy tail.  Sadly, very booger-like in this pic.

Attach to the body.
Step 11-  Time to form the ears.  I find it easiest to start off with a ball.  Then squish it pretty flat, leaving one side rounded and the other side pointed.  Make the pointy end a bit thinner than the rounded base.  This is going to be your ear.  Make two.

Attach to the body by gently pressing.  A wooden tool comes in handy for securing the base a bit.  Also, when you apply the ear, try to make it curve a bit.  Pig ears are floppy and imperfect.

Step 12- Get a bit of green clay and make a short, fat "worm".  Connect it so it forms an "O" and flatten it a bit.  Attach it to the body so the connected part of the "O" is at the bottom.  It will later be covered up with a bow.

Using your wooden shaping tool, toothpick, or whatever you have on hand, make indentations all around the wreath.  The neater you keep it, the nicer it'll look... at least as far as Sculpey Studio is concerned.  If you decide to use a softer clay, you can mash it around a bit to look a bit more plant-like.

Now, roll two small balls of red clay and indent them with "v"s on one edge of each ball.  Place at the bottom of the wreath.
Finally, roll a super tiny ball of red and attach it over the middle of the "v"s to form a bow.  I flattened mine out slightly with a wooden shaping tool.

Step 13- Cut a short length of wire.
Wrap wire around a round object.  I used my metal clay tool.  Wrapping it around a round object will keep the loop nice and round as you twist the wire.  Once it's wrapped, use your needle nose pliers to twist a bit of it and trim off the extra.  There's no specific length that it has to be, as long as it's long enough to go through the base of the hat and into the main part of the body.

Twisting the wire and forming a loop.
Insert wire into main body of the pig, through the base of the Santa hat.
Now, smooth over the part where the white band meets in the back.  (If you had done it before this point, it may have separated when you inserted the wire.)

    Add a bit of Bake and Bond to the wire loop at the base.  When it bakes, it will act as a kind of superglue for the wire loop.  The loop could probably do without glue (and I have made ornaments without it that were perfectly fine), but I like the added bond. 

Step 14- Bake your ornament.  As I said before, my clay bakes at 275 for half an hour.  Read the instructions on your clay if you are using something different.  I also bake my projects in a craft oven on top of a silicone sheet.  However, a regular oven can work just as good, if you bake your projects on a cookie sheet that is SPECIFICALLY for craft projects (not food) and on top of a piece of waxed paper.  (Waxed paper on cookie sheet, project on waxed paper... set and ready to bake.)
Once it has baked, allow it to cool completely.

Step 15-  Use white paint to add dots to the eyes.  This really brings it to life.  You can also use a fine-tip Sharpie to write your initials on the bottom (I also add the year).

Applying with metal tool.

Once the eyes have been painted, allow them to dry and then apply the satin glaze all over the entire body.  Let that dry completely and then add the ribbon to the loop so it can hang. 

Finished!


Tuesday, December 6, 2011

I'll be gnome for Christmas...

I love mail.  Going to the mailbox is like a mini-Christmas everyday.  I especially love it when I get catalogs, it's the laziest form of window shopping there is.

Flipping through the most recent "West Elm" catalog, I came across this:
West Elm Gnome Ornament $7


   I thought it was adorable, but it only came in red.  I figured I'd make my own.

Things you'll need:

Felt (2 colors)
Embroidery Thread (I used white, green, and black.  I think on the next one I would just use the white around the borders, though, more closely matching the West Elm version.)
Scrap of yarn
Needle
Scissors
Pins
Scrap paper

Step 1- Cut out the general shape of the gnome using a piece of paper and pin it to a folded piece of felt.  Cut around the template so you have both a front and a back piece.
Front and back piece cut out with template still attached.

Step 2- Cut beard and eyeball oval out of white felt.  You can cut a template out of paper first if you'd like (I did) to get the size right so you're not accidentally wasting felt.

Step 3- Sew beard and eyeball oval to front piece of felt using two strands of embroidery thread.


Step 4- Embroider eyes and mouth using black embroidery thread.  I did two French knots for the eyes, wrapping the thread around 4 times for a larger knot.  The mouth was stitched straight across and secured in the middle to kind of give him a "happy" look. 

French knot eyeballs.

Step 5-  Tie your scrap of yarn so you have a loop the length you'd like the ornament to hang.  Optional: Then, embroider the back piece of felt with your initials in whatever color you'd like.  I embroidered my initials in black on the foot.


Step 6- Start sewing the front and back together, securing the loop of yarn at the top of the hat in-between the stitches.  I used a whip stitch on this one, but might try a running stitch next time.  Good thing about the gnome is it's super easy and any mistakes just make it more whimsical.  ;)

    When you get about an inch away from closing up the gnome, stuff it with a little bit of polyfill.  Finish closing.


Finished!


  I plan on making two more.  A red one for Cam, and a pink one for Scarlett. 

  Coming soon... polymer clay Christmas piggies.

Tuesday, November 1, 2011

Trick or Treat!- Mime Costume Complete

Okay, so I didn't mean to rhyme the title, but once it was up I just decided to leave it.

I have very few personal titles, but one that has held true through the years is "World's Worst Procrastinator".  I am horrible about it.  That's why my going to school online is like a circus at the end of the semester (rushing to cram everything in), and why Halloween costumes sometimes aren't finished until Halloween.

This year, Kai wanted to be a Mexican Wrestler after seeing the cover of "Nacho Libre".  No problem.... done.  Cam wanted to come up with his own Harry Potter costume... got it.  Scarlett, however, was going to be a mime.

Do you know how hard it is to find a black and white striped shirt for a little girl?  One that is plain without Minnie Mouse, some kind of heart, or cutesy saying?  Impossible.  Impossible unless you are willing to pay designer prices and special order something that you've never even seen.  Call me thrifty, call me cheap, I just decided that rather than deal with that funk... I'd just make it myself.

Ordered the knit striped fabric from Etsy, got some sparkly red sequined elastic trim from Joann's, and pulled out some tulle from my stash.

The end result?
I can't believe I didn't take more pictures, but I do have some videos (if I can figure out how to post one, I will). 

The shirt was completely my own pattern.  I LOVE how it came out.  I don't know how to describe it other than a semi-cowlneck/mock turtleneck.  I plan on buying more knit fabric and recreating it for a tutorial. 

The tutu was made out of 3/4" elastic that was 1" shorter than her waist measurement and the ends sewn together.  After that, I made the tutu the same way that I did on my "Ribbon Tutu-rial".  (See Tutorial section above for link.)  Alternated the colors for a cute stripe-like effect.

The suspenders were the trim material that I talked about above.  I got grumpy about not being able to locate clips that were affordable, until I came across some ironing board cover clips.  PERFECT!  I got a package of 6 for the same cost as a pack of 2 at Joann's.  (Both are at Joann's.)  Cut the elastic off the ironing board clips and sewed the elastic trim on.  Used an "o" keyring at the "y" joint in the suspenders.  Thank goodness that elastic suspenders are super forgiving.  I only had to measure and sew once.  Yay!
The black leggings were purchased at Old Navy.  And her gloves were a set of $1 cheap-o winter gloves.  So funny trying to watch her put candy into her bag.  Poor girl needed help every time.

Oh, and the hairbows were made out of felt.  I used this tutorial from "C.I.N.O."

Hope you all had a happy and safe Halloween!