Showing posts with label Christmas. Show all posts

Saturday, December 22, 2012

Embellished Burlap Table Runner How-to

     I wanted to have something fantastic on the table for Christmas dinner this year.  I've seen a lot of burlap being used for various projects and thought to myself, why not a table runner?  From there, the idea just kind of took off on it's own and evolved several times.  At the end, though, I'm super happy with what came to be...

         
    There were a few firsts for me, (using burlap, fabric ink, and a new material for stenciling) so it was a bit of a shot in the dark experiment.  Sometimes shots in the dark work out!

Here's what you'll need:

Main fabric- I used burlap.  You can find it at your local fabric store.  You'll want enough to have one continuous strip across your table plus about 12" or so on either side to hang over.  (So length of table + 24")
Backing fabric- I used muslin that I had in my fabric stash.  There should be the same amount of backing as there is main fabric.
Rotary cutter and Scissors
Ruler or measuring tape.
Sewing Machine
Thread
Pins
Paint Mask- This was a first for me.  I guess this stuff is used for painting cars, but it can be found at vinyl suppliers (I used H&HSignSupply.com).  You'll need enough for your graphics plus a 1-2" border around the design.
Transfer tape or contact paper
Squeegee
Sponge Paint Brush
Fabric ink- I used the stuff that came in my Silhouette kit, however, it's the same as you can find at the hobby store for silkscreening.
Vinyl Cutting Machine or a steady hand, utility knife, and a lot of patience- I used my Silhouette Cameo, as I am seriously lacking in that kind of patience and it was a huge design.  If it's just a small one, I could see doing it by hand, though.
Weeding Hook or needle and tweezers
Iron and/or Heat Press- I used both, though just an iron would be okay.  You'll see in the tutorial how I used them.
Freezer paper or scrap paper- To keep the ink from bleeding through onto the surface of whatever you are painting on.

Step 1- Cut your main fabric and backing to the size of your table plus 24" (that gives you 11" of overhang on either side after factoring in a 1" seam allowance) for the length and then the width you want plus 2".  (Mine was 20" wide.)  For burlap, I found that an easy way to make a straight cut was to pull on one of the end threads.  It would gather the burlap and eventually snap, but left a nice, clean straight line to follow for when you cut it.
Step 2- After your main fabric and backing are cut, iron freezer paper on to the back of your main fabric.  (Main fabric being the top fabric that you are going to paint.  See which side of the burlap you want to use... some sides are prettier than others, and iron the freezer paper onto the ugly or "wrong" side.
And keep ironing...
... until the back parts of the runner that will have the graphics on them is completely covered.

Step 3- Using your cutting machine, cut out your design on your paint mask.  You may have to cut the paint mask down to fit onto your mat.
     Also, if your design is large.... you may have to cut it in several sections.

Step 4-  Weed your design.  Using your weeding hook, remove the parts of the stencil that you will want to paint.  This part may leave you a little covered in paint mask vinyl.

Step 5-  Lay out your design the way you want it.

     Once you're happy with how it looks (keep seam allowances in mind!  Don't place it too near the edge or some may disappear into a seam), use your transfer tape or contact paper to remove the design from the backing and onto your main fabric.  (Use the squeegee over the transfer tape once it's on top of the vinyl and then peel off the backing... then place it on your main fabric and squeegee again.)  Before I put the contact paper on top of the vinyl to remove it from the backing, I like to stick the contact paper on the carpet and pull up a few times to get the stickiness down a bit.  Makes it easier to remove later.


Step 6- This is BY FAR the hardest part of making this.  Peel back the transfer tape.  Go slow, take your time.  Cut the excess transfer tape away as you're doing it. I don't have a photo of this step because I was charging my phone, but use one hand to hold down the vinyl and the other to remove the transfer tape.  This takes awhile.  Be patient.

   I do, however, have a pic of some of the words with the transfer tape peeled off while the rest wait for  transfer tape and placement.
     As you get the decals on there, go back over them gently with your squeegee, and/or press firmly with your hand to resticky it to the main fabric if it came up at all.

Step 7-  Now comes the fun part.  Using your sponge brush, apply the fabric ink to the decals, being careful to stay within the frame of the decal and not go out of the lines.  I did a thin coat and waited for it to dry.  Then did a second coat a bit thicker... blotting up and down with my brush.
     What you DON'T want to do, is paint so forcefully that you pull up your stencil... or blob so much paint that it bleeds all over the place regardless of the stencil.  The freezer paper will also help keep the ink in check.

Step 8-  Once the paint is COMPLETELY dry, peel back the stencil.  This was my favorite part by far.  So fun to see the end result peeking through.  Then, heat seal it.  You can either use an iron and iron through a protective layer of fabric (such as an old pillowcase) or a heat press if you want to blaze through it.  Make sure you use a teflon sheet if you use your heat press.

Step 9-  Now it's time to sew it together.  Pin your fabric right sides together.  Starting on one long side, sew down and around 3 sides with a 1" seam allowance.  Leave one short side open so you can turn it right-side out.  Iron.

Step 10- Tuck the unsewn short side inside 1" and press flat.  Sew as close to the edge as you can.  To finish the runner off, top stitch around the entire  runner.  I topstitched slightly under 1" to catch and hold all of the layers.  Then, you're done!


     Send pics if you guys make some!  I'd love to see them.  Enjoy!

Monday, December 10, 2012

Christmas Ornament: Polar Bear in an Ice Cave

     This weekend consisted of a lot of experimentation with ornaments.  I had found this fantastic glitter paint that I wanted to try using to coat the inside of glass ornaments.  I thought that maybe it would be even easier than glittering.  (Boy, was I WRONG.)

     In the course of my ornament experimentation, I managed to blow up an ornament in my oven, resulting in a massive glitter bomb.  I also wasted more ornaments than I care to think about trying different techniques.

     One of those techniques was just coating the outside of the ornament.  It was successful, but what's the point if you can't adhere vinyl to it and can find them at any dollar store... minus the mess and hassle?

     While coating the outside of the ornament, I noticed that the paint dripped down in a neat way.  So I did one ornament that was completely coated to test the technique, and the other one, I added significantly less.  I WANTED the drips.  To me, it looked like a cave... an ice cave.  Awesome.  I immediately knew what I wanted to do.


And I also did the back.

     When I was thinking about the design of the ornament, I went looking for some cute polar bear artwork, but nothing seemed to fit what I was looking for.  So I made my own.  :)


     I'm really loving the Designer Edition of Silhouette Studio.  Lots of neat tricks!

     I cut out all the vinyl, adhered it to my transparency to make the bear "float" in the middle of the glass ornament, and then added Swarovski crystals to the snowflakes for a little extra pop.  Super excited about this one!


And a few pictures of my experiments this past weekend.


     The vast majority were fails... but you can't win them all!

Sunday, December 9, 2012

DIY Glitter Ornament Tutorial

     Both of the boys have class Christmas parties coming up and I wanted to do something special for their classes.  What better thing to give at the party than some homemade ornaments?  Plus, it gave me an excuse to pull out the glitter.  Win/win!

     So far, I've finished one class:
And ALMOST finished another class:

Here's how you do it....

Supplies
1.) Ornaments- either glass or plastic clear ornaments with removable cap.
2.) Floor polish or Liquid hair spray- Use Pledge with Future Shine (must have Future Shine to make the glitter adhere properly) for glass ornaments or liquid (non-aerosol) hairspray for the plastic ornaments.  You can find this at the dollar store.
3.) 2 funnels- Not 100% necessary, but definitely helps.  I wish both of mine were plastic, but I only had one plastic that I used for the hairspray.  I made my other one for the glitter out of a piece of paper and tape.
4.) Extra fine glitter-  I used "WOW" glitter for Cam's class and Martha Stewart Neon Glitter for Kai's class.
5.) Glue to secure the tops when you are done.  (E6000 works great)
6.) Rubbing alcohol or distilled white vinegar (rubbing alcohol works best) to clean ornaments.


Just those supplies above (also, vinegar and glue) are what you need to glitter ornaments.  If you want to add vinyl embellishments, you will also need:

vinyl
transfer tape
scissors
Silhouette or Cricut cutting machine, or a lot of patience and a crafting knife.


Okay, down to business.

Step 1-
Pull the cap off your ornament.  Clean out the inside of your ornament with rubbing alcohol (just pour in and shake) and let dry completely.
Cap off, ready to be cleaned.

Step 2-
Once completely dry... using your funnel or a steady hand, pour your hairspray (plastic ornaments) or floor polish (glass ornaments) SLOWLY into your ornament.  You want to do it slowly to avoid bubbles that might mess up your glitter later.  A bubble here or there isn't anything to worry about, but frothy bubbles all over will make your ornament look messy and clumpy.  When using floor polish, I found that adding some and "swirling" (NOT SHAKING, that will make tons of bubbles) it gently around the inside of the ornament worked best.  For hairspray, I just filled the ornament up to the top and then poured it back into the hairspray bottle using the funnel.  You want to make sure to coat the entire inside of the ornament, don't miss any spots or you'll have bare spots where your glitter won't stick.
Ornament full of hairspray

Step 3-
Once your ornament is coated on the inside, pour the excess fluid back into your bottle, being careful not to make bubbles.
Step 4-
Right after pouring out the excess fluid, quickly add glitter using a funnel, then plug up the hole with your thumb or paper towel and shake... making sure to coat the inside of the ornament evenly.

     Beware, this step may result in severe "Purple Glitter Thumb".  ;)
Step 5-
Prop the ornament up and let it dry completely.  I let it sit for about an hour or so.
Step 6- 
Once ornament is completely dry, pull the wires on the cap until the ends click.  (Hard to describe so I took a picture.)  Don't pull it all the way out, just pull until it's ALMOST out.
Step 7-
Add a little glue to the inside of the lid and then place it over the top of the ornament, keeping the wires up while you place it and hold it securely.
Step 8-
Pinch the wire and push it into the ornament slowly.  Pinching it will help keep the wire from scraping the sides of the ornament.  This way, you're not scraping up all that pretty glitter work you just did.  ;)

     That's it!  Easy as can be!

    You can choose to leave them as-is, or embellish them with vinyl and/or ribbon.  It's completely up to you.  Enjoy!

Saturday, November 24, 2012

Santa and Rudolph Canvases

     I made my first canvases this week!

     There's a blank wall in my entryway that I thought would look good with a little Christmas art.  When I saw the Santa file on my Silhouette group, I knew exactly what I wanted to do.  I went to Michael's and picked up some canvases (value bundle pack) to decorate, prepped them with some white acrylic paint, and then vinyled them.  Of course, Santa couldn't be alone, he had to have his buddy, Rudolph, with him.

     So happy with how they both turned out!  I may be slightly hooked on this "canvas" thing now.  :)

     The Santa artwork is originally from Pottery Barn and someone in the group was kind enough to share the file with us.  Rudolph, I created after seeing a beautiful wall hanging in the "Land of Nod" catalog.

     I had a few requests for a tutorial on how I made Rudolph, so I learned how to use iMovie... with the help of my 9 year-old son.  Guess I have finally crossed the threshold into "old fart" territory.

     Here's how I made Rudolph:

     Hope this helps give you all some tips and tricks!

Tuesday, November 20, 2012

William's Sonoma Knockoff- Christmas Glasses

     I LOVE, absolutely LOVE Williams Sonoma.  However, I rarely shop there because of the price.  Their stuff is fantastic and absolutely beautiful, but I just can't bring myself to shell out that kind of money when I still have kids in the house who would take those beautiful things and trash them completely within minutes.  :)

     Flipping through their most recent catalog, however, I saw a set of glasses that I loved.  They had beautiful pine trees etched into the side and just screamed "Christmas".  Price for a set of 4?  Hold on to your socks... $69.95.  WOW.

     I had a quick thought, though.  Those pretty glasses didn't look so hard to make.  I had all the stuff to recreate it.  Just had to do it.

     In the end, I'm thrilled with how they turned out.  The glass on the left is from Williams Sonoma and a set of four sell for $69.95.  The one on the right is my recreation, and a set of four cost me a measly $4.  SCORE!


     To recreate them.  I used 4 glasses that I picked up at the dollar store for $1 each.  I also had a free sample of Series 351 Metallized vinyl in silver from Oracal that I had received from their website.  (Sign up for an account and you can get 5 samples per month.  Great way to try out new vinyl.  I'm now dying to get more of this stuff.)

     To get the artwork, I uploaded the .jpg image of the Williams Sonoma glasses into the Silhouette software and used the trace feature to select and trace the trees.  I don't have a specific formula or set of rules for this, I just mess with it until it "feels" right.  Once I had a good trace, I deleted all of the super tiny dots that wouldn't be easy to vinyl on, enlarged the middle tree, and played with the sizing and placement of the other trees until I was satisfied.  I then replicated it to have four... one for each glass.

     After that, it was just a matter of sending it to the Silhouette to cut.  I used a blade setting of 2 and lowered the speed by one (down to 8, I believe... whatever is one less than the normal vinyl setting) because the cut is very detailed.

     When the Silhouette was finished cutting, I weeded out the part of the vinyl that I didn't want to adhere to the glass.  Applied transfer tape, and then transferred it to the glass.  Peeled back the tape... and had my new Christmas-y set of glasses!

     Sometimes it pays to be cheap.  ;)


Thursday, December 8, 2011

Poly Clay Christmas Piggy Ornament

 "Oink! Oink! Oink!"  In case you don't speak pig, that means, "Merry Christmas!  Time to make a piggy ornament!"  

   Polymer clay is a lot of fun to work with.  I was telling the ladies on my sewing forum that I have a short attention span, so short, easy projects always work best for me.  Poly clay ornaments are the perfect project when you don't have a TON of time, but still want to make something cute.

    Last year, I made some Christmas piggies for a friend's boys.  They turned out so cute that I wanted to try to recreate them for my kiddos.  I had already made hedgehog ornaments for my guys, so I decided to put it off until next (this) year.

    Here's the first!  Complete with tutorial.
Supplies- (many of these are optional or you can substitute with other things, I'll try my best to break it down)

     Before I get into the specifics, the clay that I prefer to use is Sculpey Studio.  It's more firm than some other polymer clays, which is good and bad.  Good because it holds its shape really well, but bad because it can make it more difficult to mold and/or blend.  I definitely recommend having clay softener on hand if you use this type of clay.  One drop goes a LONG way.  Don't use more than that without really needing it, otherwise you'll end up with slick, slippery, gooey clay.  Egh!  Like working with clay snot.

   Also, I have a little mini clay oven and silicone pad that I use specifically for baking my poly projects.  However, a regular oven works fine.  Just be sure that any cookie sheet you use for baking poly projects will NOT be used for food after.  Just designate one sheet for crafting and only use it for that purpose.  Before I had my craft oven, I used a regular oven, a cookie sheet (designated for craft projects, not food), and I would bake the clay on waxed paper placed on top of the cookie sheet.

Okay, now the list:
*= Optional or can be substituted with something else or worked around.

Clay- I used Sculpey Studio #6210 (Poppy), #6452 (Peapod), #6207 (Sedona), #6316 (Blush), and #6101 (Whipped Cream)
*Clay Softener- very useful with Sculpey Studio clay, but not 100% necessary.
Wax Paper- for sculpting on and/or baking
*Fine-tip Sharpie- for marking initials on the bottom of your ornament
Flexible Wire- for making the hanging loop
Ribbon
Paintbrush
White paint
Satin or Gloss Glaze- (I used Satin)
Clay "ball" tool- This looks almost like a pen with a little metal ball on the end, great for making perfectly round holes (i.e.- "nostrils") 
Wooden Clay tool for shaping- Mine has a thin edge for making lines/gouges, and a blunt edge
Wooden Clay tool for cutting- Used for trimming off excess clay and neatening edges
*Bake and Bond- I apply this to the wire loop for added security.  It's possible to make it without, but I like my stuff to be super durable.  With my kids, it needs to be...
Needlenose pliers- For twisting the wire loop
*Metal decorating tool-  I use this in a lot of different ways.  Smoothing, painting dots on the eyes, and using the fat, round end to shape the eye of the wire loop into a nice circle.  Can substitute other stuff for it, though, if needed.

Step 1- Shape the main part of the body into a smooth egg shape.  You'll also want to start preheating your oven at this point.  I used Sculpey Studio, so I preheated to 275 degrees.  If you use something else, follow the manufacturer instructions for the oven temperature.

Step 2- Make two little round balls out of the darker pink clay.  Slightly flatten them and use clay shaping tool to split each of them about halfway in to form trotters.

Step 3- Place egg shaped body onto trotters and push down firmly, but without squeezing body or changing its shape.

Step 4- Take darker pink clay and roll into a ball.  Flatten and shape into an oval.  Add your snout to the body.

Use your metal ball tool or other rounded object to make "nostrils".  Push all the way back into the body, this will ensure that the nose is stuck on really well.

Step 5-  Using the same method as Step 2, make two more trotters.  Add to sides of body, leaving a gap big enough for the wreath he'll be holding.

Step 6- Add eyes.  Roll a tiny bit of black into a slightly oval shape.  Attach using fingers or wooden tool.

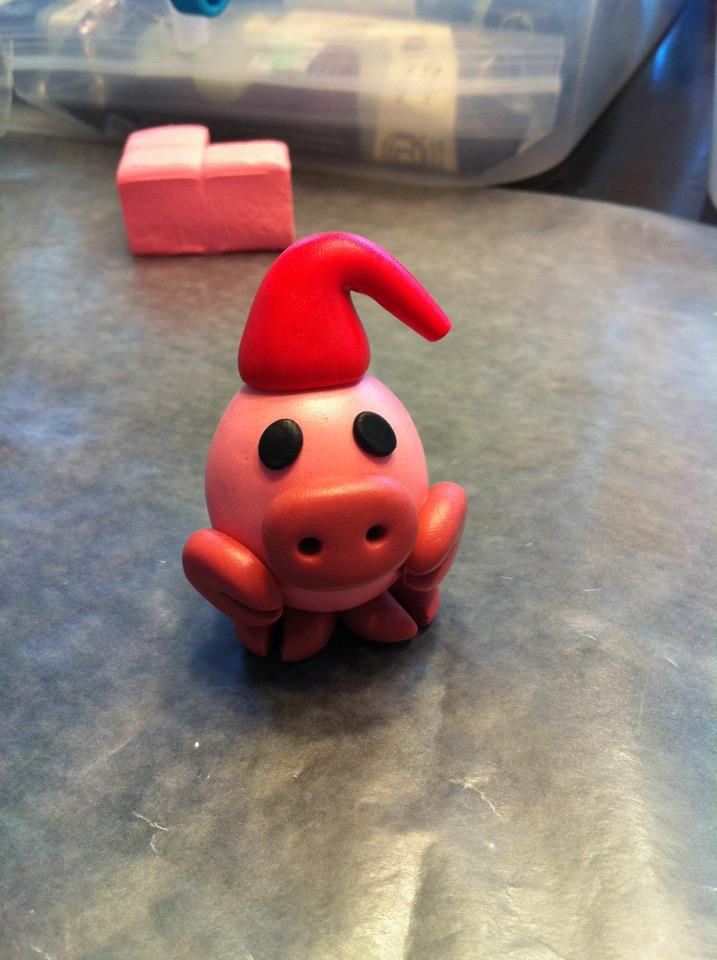
Step 7- Roll red clay into a ball and then start applying pressure to only one side to thin it out and make more of a cone shape.
Fold over smaller end and cut off excess at the bottom.  Honestly, this part is all about "eyeballing" it.  Hold it up to your pig (without touching it) and see how much you should trim.  You can always trim more later, so don't hack off a huge chunk at first... keep trimming until it looks right.

Step 8- Attach hat to head.  Push down firmly, but without misshaping the hat.

Step 9- Roll out a long "worm" of white and wrap it around the base of the hat.  Make sure the line meets in the back.  Don't worry about blending the line yet, you'll do that later.

Use your wooden tool to flatten the white band all the way around, making sure that it's firmly attached.

Then add a white ball to the end of the hat.

Step 10- Roll out a very tiny dark pink "worm" that is thicker on one end than the other.  Then, loop it around so it corkscrews back on itself for a piggy tail.  (BTW, the next picture just looks horrible.  Like a curly pink booger.  I apologize.  Lol!)

Yes, that's a piggy tail.  Sadly, very booger-like in this pic.

Attach to the body.
Step 11-  Time to form the ears.  I find it easiest to start off with a ball.  Then squish it pretty flat, leaving one side rounded and the other side pointed.  Make the pointy end a bit thinner than the rounded base.  This is going to be your ear.  Make two.

Attach to the body by gently pressing.  A wooden tool comes in handy for securing the base a bit.  Also, when you apply the ear, try to make it curve a bit.  Pig ears are floppy and imperfect.

Step 12- Get a bit of green clay and make a short, fat "worm".  Connect it so it forms an "O" and flatten it a bit.  Attach it to the body so the connected part of the "O" is at the bottom.  It will later be covered up with a bow.

Using your wooden shaping tool, toothpick, or whatever you have on hand, make indentations all around the wreath.  The neater you keep it, the nicer it'll look... at least as far as Sculpey Studio is concerned.  If you decide to use a softer clay, you can mash it around a bit to look a bit more plant-like.

Now, roll two small balls of red clay and indent them with "v"s on one edge of each ball.  Place at the bottom of the wreath.
Finally, roll a super tiny ball of red and attach it over the middle of the "v"s to form a bow.  I flattened mine out slightly with a wooden shaping tool.

Step 13- Cut a short length of wire.
Wrap wire around a round object.  I used my metal clay tool.  Wrapping it around a round object will keep the loop nice and round as you twist the wire.  Once it's wrapped, use your needle nose pliers to twist a bit of it and trim off the extra.  There's no specific length that it has to be, as long as it's long enough to go through the base of the hat and into the main part of the body.

Twisting the wire and forming a loop.
Insert wire into main body of the pig, through the base of the Santa hat.
Now, smooth over the part where the white band meets in the back.  (If you had done it before this point, it may have separated when you inserted the wire.)

    Add a bit of Bake and Bond to the wire loop at the base.  When it bakes, it will act as a kind of superglue for the wire loop.  The loop could probably do without glue (and I have made ornaments without it that were perfectly fine), but I like the added bond. 

Step 14- Bake your ornament.  As I said before, my clay bakes at 275 for half an hour.  Read the instructions on your clay if you are using something different.  I also bake my projects in a craft oven on top of a silicone sheet.  However, a regular oven can work just as good, if you bake your projects on a cookie sheet that is SPECIFICALLY for craft projects (not food) and on top of a piece of waxed paper.  (Waxed paper on cookie sheet, project on waxed paper... set and ready to bake.)
Once it has baked, allow it to cool completely.

Step 15-  Use white paint to add dots to the eyes.  This really brings it to life.  You can also use a fine-tip Sharpie to write your initials on the bottom (I also add the year).

Applying with metal tool.

Once the eyes have been painted, allow them to dry and then apply the satin glaze all over the entire body.  Let that dry completely and then add the ribbon to the loop so it can hang. 

Finished!