
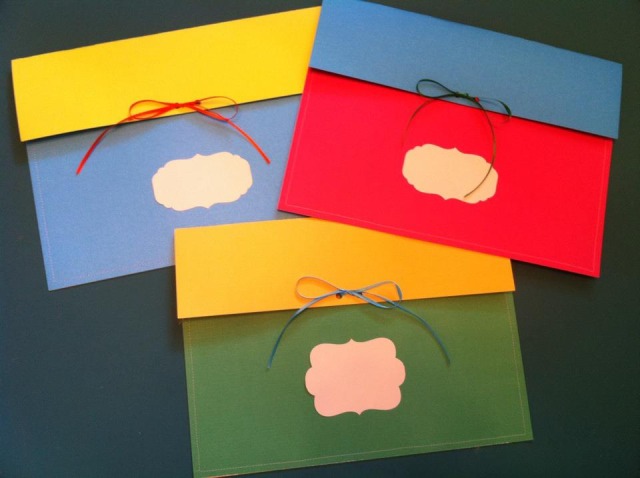
I wanted to do something easy, something that I could make with things I already had. I came up with these:

They were one of the easiest projects I've done. Here's how you do it...
Supplies You'll Need (for a single envelope)
1 1/2 pieces of 12 x 12" cardstock. One will be left intact, the other should be cut in half smack down the middle
20" ribbon
Sewing machine and thread
Cardstock to make labels (I made mine with my Silhouette Cameo, or you can purchase pre-made labels)
Hole punch
Double-sided tape or sticky dots
Step 1-
Make sure that you have one piece of 12 x 12" cardstock and another piece that has been cut exactly in half. They can be the same color for a solid-color envelope, or different (as I did for the above envelopes) for a multicolor envelope.

Measure to the halfway point of the shorter piece and punch two holes equal distance from the middle. Then, use this as a guide for punching the top of your larger piece. I laid the smaller, punched piece on top, lined up the edges, and then used the holes as a guide to punch the larger piece.

If you are making multiples (as I did) lay out your cardstock and place your colors at random. Otherwise, just lay your small piece on top of your large piece with the holes up on both sides. Unpunched sides lined up along bottom. (Smaller piece on top of the larger piece... lined up at the bottom.)

Starting at the right top edge of the small piece, start sewing (backtack at the beginning and end) around the outer 3 edges.

Step 5-
Cut 20" of thin ribbon and run it through the backside of the short piece and up through the big piece.


Step 6-
Use double-sided tape to secure labels to the envelopes. You're done!
These can be used to keep all kinds of things. You can store labels, stickers, what-have-you. I chose to use them as rainbow Valentine holders. The kids in the class can write their names on the envelopes to tell whose is whose.
Another project I tackled today was Cam's Toad Valentines. Not sure if you guys remember the chocolate frogs that I made for Cam's Harry Potter birthday, but I don't like to use things once and let them sit there unused for years at a time. I had a great time making the chocolate frogs and brainstormed for a way to break out the frog mold again.
Why not have frog Valentines?
At first, I thought of "You make my heart jump". However, Travis thought that it was too "girly". While having a conversation with my Mom, we decided that "You're Toad-ally Awesome" would be a much more "manly" Valentine. Frogs, toads, the mold could go either way.
Once again, I decided that it was time to use the Silhouette machine. Nowadays, I wonder when I DON'T use it. I created the labels from scratch using the Silhouette software. Drew a rounded rectangle that would fit the bags I purchased for putting the toads in. Then, I copied and pasted another rectangle to match it, welded the two together, formed the letters (Flipped the "To" and "From" side upside-down), and added some free graphics that were available through an Internet search. (DO NOT STEAL GRAPHICS. MAKE SURE YOU HAVE PERMISSION TO USE THEM OR THEY ARE FREE FOR PERSONAL USE.)
The labels were then printed on my printer and then cut on the Silhouette.


Now it was time for my favorite part... making the chocolate frogs, err... toads.
I used Wilton's candy melts in white and red. The girls got pink toads (white mixed with a teeny bit of red), and the boys got white toads.
 |
| In the mold, then into the fridge. |

I did one batch at a time, rotating through the steps. As one was being sealed, more were coming to room temperature, even more were in the fridge, and the whole cycle just continued.
First batch of girl toads in their heat-sealed bags:

The final step in the process was to staple the card toppers to the bags (without disturbing or going below the heat seal).
The finished result:


There were a few more that didn't make it on the plate, but I'm sure you guys are able to get an idea of how they came out.
Ready for Valentine's Day!
Thanks for sharing the DIY Envelope. i was wondering exactly how you did them. Pinned!
ReplyDeleteNo problem! They are super easy to do and can be used for a lot of different things. Great for organizing stickers or labels. :)
ReplyDelete