So far, I've finished one class:
And ALMOST finished another class:
Here's how you do it....
Supplies
1.) Ornaments- either glass or plastic clear ornaments with removable cap.
2.) Floor polish or Liquid hair spray- Use Pledge with Future Shine (must have Future Shine to make the glitter adhere properly) for glass ornaments or liquid (non-aerosol) hairspray for the plastic ornaments. You can find this at the dollar store.
3.) 2 funnels- Not 100% necessary, but definitely helps. I wish both of mine were plastic, but I only had one plastic that I used for the hairspray. I made my other one for the glitter out of a piece of paper and tape.
4.) Extra fine glitter- I used "WOW" glitter for Cam's class and Martha Stewart Neon Glitter for Kai's class.
5.) Glue to secure the tops when you are done. (E6000 works great)
6.) Rubbing alcohol or distilled white vinegar (rubbing alcohol works best) to clean ornaments.
Just those supplies above (also, vinegar and glue) are what you need to glitter ornaments. If you want to add vinyl embellishments, you will also need:
vinyl
transfer tape
scissors
Silhouette or Cricut cutting machine, or a lot of patience and a crafting knife.
Okay, down to business.
Step 1-
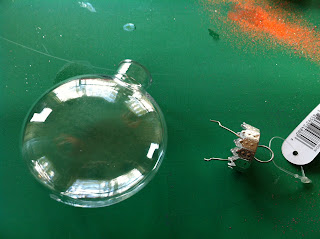
Pull the cap off your ornament. Clean out the inside of your ornament with rubbing alcohol (just pour in and shake) and let dry completely.
 |
| Cap off, ready to be cleaned. |
Step 2-
Once completely dry... using your funnel or a steady hand, pour your hairspray (plastic ornaments) or floor polish (glass ornaments) SLOWLY into your ornament. You want to do it slowly to avoid bubbles that might mess up your glitter later. A bubble here or there isn't anything to worry about, but frothy bubbles all over will make your ornament look messy and clumpy. When using floor polish, I found that adding some and "swirling" (NOT SHAKING, that will make tons of bubbles) it gently around the inside of the ornament worked best. For hairspray, I just filled the ornament up to the top and then poured it back into the hairspray bottle using the funnel. You want to make sure to coat the entire inside of the ornament, don't miss any spots or you'll have bare spots where your glitter won't stick.
 |
| Ornament full of hairspray |
Once your ornament is coated on the inside, pour the excess fluid back into your bottle, being careful not to make bubbles.
Step 4-
Right after pouring out the excess fluid, quickly add glitter using a funnel, then plug up the hole with your thumb or paper towel and shake... making sure to coat the inside of the ornament evenly.
Beware, this step may result in severe "Purple Glitter Thumb". ;)
Step 5-
Prop the ornament up and let it dry completely. I let it sit for about an hour or so.
Step 6-
Once ornament is completely dry, pull the wires on the cap until the ends click. (Hard to describe so I took a picture.) Don't pull it all the way out, just pull until it's ALMOST out.
Step 7-
Add a little glue to the inside of the lid and then place it over the top of the ornament, keeping the wires up while you place it and hold it securely.
Step 8-
Pinch the wire and push it into the ornament slowly. Pinching it will help keep the wire from scraping the sides of the ornament. This way, you're not scraping up all that pretty glitter work you just did. ;)
That's it! Easy as can be!
You can choose to leave them as-is, or embellish them with vinyl and/or ribbon. It's completely up to you. Enjoy!


I did all that but don't have a Cricut so names and designs are POO :( Yours are GORGEOUS and such a great tutorial!
ReplyDeleteThanks, Jamie! I saw your ornaments and they look FANTASTIC! You did an awesome job. :)
ReplyDeleteLove those ornaments! I am a visual learner so this is great for me.:) Thanks for sharing.
ReplyDeleteHow have the ornaments held up with the hairspray method with glitter in the plastic ornament? I was just curious if it starts to chip after so long.
ReplyDeleteThanks! I made the cutest little sparkly ornaments ever! I am looking forward to decorating my mini christmas tree with these!
ReplyDelete