Showing posts with label tutorial. Show all posts

Tuesday, December 11, 2012

Etched Hurricane Candleholder Tutorial

     I LOVE the dollar store.  Specifically, Dollar Tree.  You can find some super neat glass items there to experiment on, and not worry if you completely mess it up because... if you do, it was only $1 *shoulder shrug*... and if you don't, it was only $1!!! *excited happy dance*

   So this was my first time etching glass.  I was a bit nervous, but I found that I absolutely LOVED it and I thought you guys might too.

    See what you can make?  Doesn't take much and it's not only inexpensive, but LOOKS fantastic.

Here's what you'll need-

Hurricane candleholder or other glass item to etch
Etching cream (I used EtchAll, but there are other etching creams out there)
Vinyl for a stencil (some people use contact paper, but I haven't tried it)
Weeding hook
Transfer tape
Squeegee
Cutting tool such as a Silhouette or a utility knife and your time and patience.
Old paintbrush


Step 1- 
     Design and cut your stencil, leaving at least a 1" edge around your design that you want to etch.  I knew that I wanted to do snowflakes on  mine so I measured the candleholder and eyeballed about how big I wanted it.  Pulled up the image in Silhouette Studio, sized it, and cut it out on my vinyl.

Step 2-
     Once your design is cut, use your weeding hook to pull out the part that you want to etch.  Make sure that you get everything you want to see etched on your glass is weeded off of your stencil.
Starting to weed out the design.

Weeding complete

Step 3- 
     Lay your transfer tape over the top of your design and squeegee across your stencil to get the vinyl to stick to your tape.  Then transfer the design over to the glass.  Go SLOWLY.  Make sure you line up your stencil before placing it on your glass.  Then, squeegee it down REALLY WELL.  You don't want any bubbles or lumps on the design part of your stencil.  (Around the edge doesn't matter, but you want to make sure that the design part is squashed on there nice and tight so the etching cream doesn't leak out through a non-secure part and blur or smear your design.)  I squeegee'd and then went back over with my fingers.

Step 4-
     Gently peel back your transfer tape and then re-eyeball your design.  I ran my fingers over it again (and held it up to the light to check for bubbles around the design edge) to make sure that it was stuck on there really well where the design was.  Make sure the placement and everything is where you want it because once you put the cream on, you're stuck with it.  :)
Check your stencils
Step 5-
     Using your old paintbrush (**DON'T TOUCH THE CREAM WITH YOUR BARE SKIN**), blob the etching cream on there.  Be GENEROUS, don't skimp on this part, but be careful where you put it, if you go outside of your stencil, your glass will have a mark.

Step 6- 
     Wait.  :)  I waited 30 minutes wiped a part off (use a paper towel, don't wipe with your hand) and held it up.  It wasn't as deep as I wanted it to be, so I reapplied to that spot and waited 30 more minutes... then went on to Step 7.

Step 7-
     By this point, my kids were wigging out and jumping around like crazy.  I completely forgot to scrape the excess cream back into the jar and, instead, I was rushing and didn't realize until I had already started to rinse and the pic was taken.  Right now is when you should scrape the excess cream off and put it back into the jar.  THEN rinse it off.  (I was kicking myself afterwards.)
     If, after you rinse, you are still not happy with how deep the etching is, you can dry it off completely, and then redo Steps 5-7.  If you're happy with how it looks, then you can move on to Step 8.

Step 8-
     Remove the stencil and take a bow.

     Or take two....
   Once you're finished congratulating yourself, do it again after you decorate.  ;)


    Enjoy.

Sunday, December 9, 2012

DIY Glitter Ornament Tutorial

     Both of the boys have class Christmas parties coming up and I wanted to do something special for their classes.  What better thing to give at the party than some homemade ornaments?  Plus, it gave me an excuse to pull out the glitter.  Win/win!

     So far, I've finished one class:
And ALMOST finished another class:

Here's how you do it....

Supplies
1.) Ornaments- either glass or plastic clear ornaments with removable cap.
2.) Floor polish or Liquid hair spray- Use Pledge with Future Shine (must have Future Shine to make the glitter adhere properly) for glass ornaments or liquid (non-aerosol) hairspray for the plastic ornaments.  You can find this at the dollar store.
3.) 2 funnels- Not 100% necessary, but definitely helps.  I wish both of mine were plastic, but I only had one plastic that I used for the hairspray.  I made my other one for the glitter out of a piece of paper and tape.
4.) Extra fine glitter-  I used "WOW" glitter for Cam's class and Martha Stewart Neon Glitter for Kai's class.
5.) Glue to secure the tops when you are done.  (E6000 works great)
6.) Rubbing alcohol or distilled white vinegar (rubbing alcohol works best) to clean ornaments.


Just those supplies above (also, vinegar and glue) are what you need to glitter ornaments.  If you want to add vinyl embellishments, you will also need:

vinyl
transfer tape
scissors
Silhouette or Cricut cutting machine, or a lot of patience and a crafting knife.


Okay, down to business.

Step 1-
Pull the cap off your ornament.  Clean out the inside of your ornament with rubbing alcohol (just pour in and shake) and let dry completely.
Cap off, ready to be cleaned.

Step 2-
Once completely dry... using your funnel or a steady hand, pour your hairspray (plastic ornaments) or floor polish (glass ornaments) SLOWLY into your ornament.  You want to do it slowly to avoid bubbles that might mess up your glitter later.  A bubble here or there isn't anything to worry about, but frothy bubbles all over will make your ornament look messy and clumpy.  When using floor polish, I found that adding some and "swirling" (NOT SHAKING, that will make tons of bubbles) it gently around the inside of the ornament worked best.  For hairspray, I just filled the ornament up to the top and then poured it back into the hairspray bottle using the funnel.  You want to make sure to coat the entire inside of the ornament, don't miss any spots or you'll have bare spots where your glitter won't stick.
Ornament full of hairspray

Step 3-
Once your ornament is coated on the inside, pour the excess fluid back into your bottle, being careful not to make bubbles.
Step 4-
Right after pouring out the excess fluid, quickly add glitter using a funnel, then plug up the hole with your thumb or paper towel and shake... making sure to coat the inside of the ornament evenly.

     Beware, this step may result in severe "Purple Glitter Thumb".  ;)
Step 5-
Prop the ornament up and let it dry completely.  I let it sit for about an hour or so.
Step 6- 
Once ornament is completely dry, pull the wires on the cap until the ends click.  (Hard to describe so I took a picture.)  Don't pull it all the way out, just pull until it's ALMOST out.
Step 7-
Add a little glue to the inside of the lid and then place it over the top of the ornament, keeping the wires up while you place it and hold it securely.
Step 8-
Pinch the wire and push it into the ornament slowly.  Pinching it will help keep the wire from scraping the sides of the ornament.  This way, you're not scraping up all that pretty glitter work you just did.  ;)

     That's it!  Easy as can be!

    You can choose to leave them as-is, or embellish them with vinyl and/or ribbon.  It's completely up to you.  Enjoy!

Wednesday, August 24, 2011

Groovy 'Shroom Dress and New House

So it's been a few weeks since I last updated... reason being, we moved!  Finally got off of on-post housing and into a rental house.  We decided to UHaul it, and... well... discovered that we aren't exactly the best movers.  Live and learn, right?

We did manage to finally get everything all set up (mostly), and I sat down and was able to sew for the first time today.  I decided to take it nice and slow and just finish a project that I had started at the "old" house.  I had the pieces all cut, just had to sew it together.

Groovy 'Shroom Dress

As I said, nice and easy.  The fabric came from Joann's, and the tutorial can be found here:  Prudent Baby Long-Sleeve Dress Tutorial

It was super-easy... the perfect thing to make if you're limited to "nap time crafty hour".  :)

As for the new house, the kids are having a blast.  They practically live in the backyard.
Weenie likes it too. 


One other perk is that I finally have enough room to have a craft room.  YIPPEE!  I've been waiting for awhile now, and can't wait to finally have some room to spread out and really have the room to work.  It's going to be a big improvement over my scary "craft closet".  Will keep you posted, but I see a trip to IKEA in the future.
In the meantime, I used the moving boxes to finally get my fabric semi-organized.  It's still a work in progress.

Friday, July 29, 2011

Chiffon Skirt Tutorial

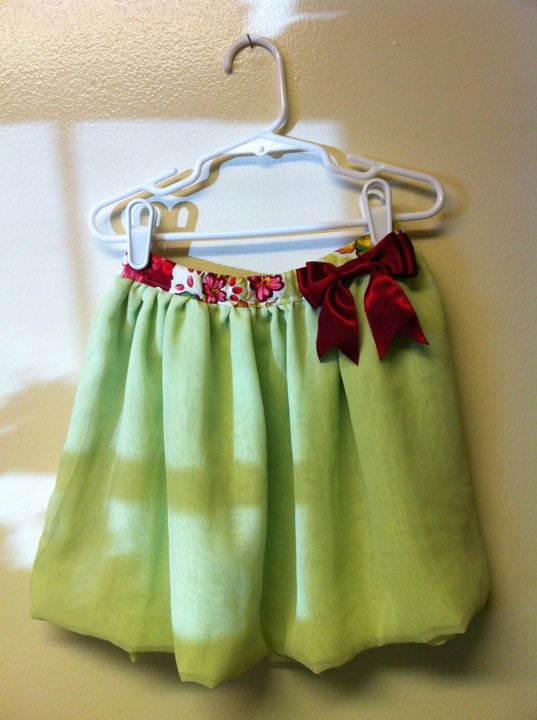
Okay, so this skirt can be worn on its own or paired up with the corset dress for extra "oomph".  Either way, it's super cute and not too hard to do. 


I tried to minimize the seams and raw edges as much as possible since this was my first time working with this material and it was super shifty.

If this is your first time working with chiffon, think of it as a crazy criminal.  If it can get away... it will.  :)

Supplies
1 3/4 yd of nylon chiffon... I cut mine down to 56" x 56" (the bolt was 60" wide), so make sure that your bolt is wide enough, or you may need to make adjustments to the steps.
3/4" elastic
Long scrap of material for waistband.  At least 4" wide and long enough to go around your child with room to spare
Bow embellishment and hand-sewing needle (optional)
Measuring tape
Acrylic ruler
Rotary cutter
Matching thread for chiffon and waistband.
Safety pin

Step 1- Measure around your child's waist and write down the measurement.

Step 2- Cut your chiffon.  For a 2T skirt with a little bit of gather but not too crazy, I cut a 56" x 56" square.  It's going to look huge, but we're going to be folding and gathering later, so no worries.  Make sure you don't have any selvedges on there.  If so, just trim them off, taking care to keep it as straight as possible.

Measure and cut.  Trim off selvedge.

Step 3- With right sides together, pin two opposite edges and sew a seam 1/2" away from the edge.  Backstitch a few stitches at the start and finish of the seam.


Pin and sew seam 1/2" from edge

Step 4- Now you should have a chiffon "tube" with the seam on the outside. 

4a.) Grab the seam at the bottom and fold the tube up so it is now doubled on itself with the wrong sides together, right sides out.

4a- Lining up the seams, wrong sides together

4b.) Fold one more time, folding the tube in half along the seamline.  Be careful to make sure that all the layers are folding evenly.  This step may include a few mumbles and grumbles.  It took me about 3 tries to get everything folded evenly and without slippage.  Chiffon is a tricky little sucker.  Be patient.

4b- Folded up twice.  Raw edges on left, right side folded

Step 5- Pin like crazy.  Pin all around the front, and all around the back.  I wanted to minimize shifting, so once the front was pinned, I just flipped it back and pinned the back from the inside.  Once it is pinned and you are sure the layers haven't shifted too much, trim the top to make it even.  Just trim a little, if you're trimming off inches and inches, you're going to end up with a Britney Spear's length skirt.  Not cool.

Pinned and Trimmed

Once pinned, stitch around the top, slightly less than 1/2" from the raw edges, all around the tube.  Then, baste directly below the stitchline for gathering.  (No need to gather yet, but when you do, just pull the bottom thread on your basting stitch.)

Step 6-  Cut your waistband.  Make the strip 4" wide and a few inches wider than your child's waist measurement.  My daughter's waist measured 18" and I cut the strip 22" long.  Gives it a little wiggle room for slipping it on.

With right sides of your waistband together, sew down the short end (backstitch at beginning and end) 1/2" from the raw edge.  Press seam open.

Align short ends and sew 1/2" from edge.

Step 7- 
a.) Gather your chiffon skirt so the top will fit your waistband. 

Gathering

b) Pin like you mean it.  Pin right sides together.  Match up side seams.


c.)Then, sew from the chiffon side (easier to manipulate fabric), making sure that your stitching falls below your previous stitches so they'll be covered later.


Step 8- Fold unattached edge of waistband back 1/2" to the wrong side and press.  Push waistband back down and CAREFULLY trim off excess bulk from where you attached the waistband in Step 7c.  Remember, don't cut too much or too close to the seam.  You're just removing extra "fluff" from the waistband so it's not bulky or poofy later.  I wouldn't cut past the original stitch line you made in Step 5.


Step 9- Now, fold waistband over to the back, making sure that the lip you ironed in Step 8 is folded up underneath so no raw edges show.  Also, make sure that the waistband is far enough down to cover your previous stitchline.  Pin in place.

Looking at the photo above, my skirt is inside-out.  I pin it that way so that I can make sure the stitching is covered on the inside when it is flipped.  Just easier for me.
Step 10- Flip right-side out and topstitch all the way around (close to the edge) until you get about 1 1/2" from where you started stitching.  Make sure to backstitch at the beginning and end, leaving a 1.5" gap to insert your elastic.  The gap should be on the inside part of your skirt. 


Step 11- Cut a piece of elastic that is the same size as your child's waist measurement.  (When cutting the elastic, do not stretch it.  Just lay it flat.)  Thread it all the way through the waistband through the gap you left. 


Then, overlap the elastic and stitch back and forth a few times to secure it. 

To finish, make sure that elastic is completely inside the waistband and stitch the opening closed.  Hand-sew on bow embellishment and enjoy!


Friday, July 22, 2011

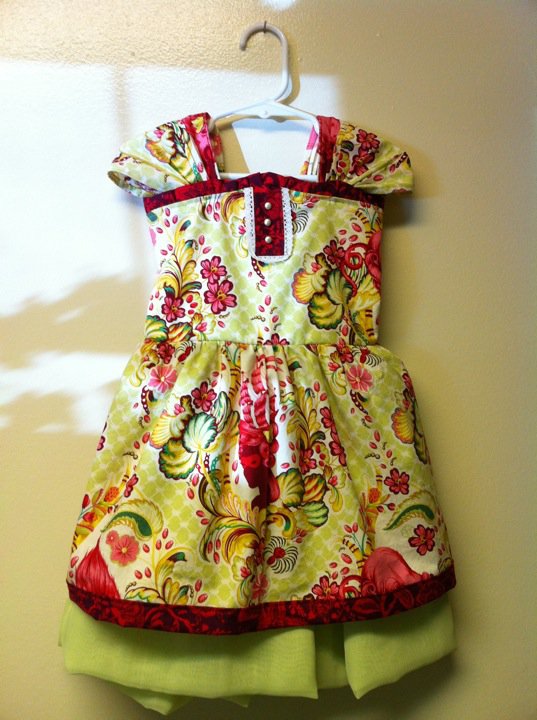
Convertible Sleeve Corset Dress with Removable Chiffon Underskirt

WHEW!  This was a whopper of a project.  I got a little excited about this week's Project Run and Play on my sewing forum.  The subject was "Colorful Couture".  After looking up "couture" to be sure that my idea was actually what is was (hey, America's Next Top Model only teaches so much), I pulled out a piece of paper and started jotting down ideas.  I wanted this dress to be flippin' outrageous.

Here is the back (my favorite part):

And the front:
The sleeves are also convertible from pleated straps to half-pleated cap sleeves:


Hand-painted antiqued eyelets-


Another option with the dress is the removable chiffon inner skirt (tutorial very soon!):
The dress can be worn with or without the chiffon inner skirt.  The skirt can also be worn with a separate shirt on its own.

Without further ado, the tutorial for the main corset dress.

I like to put warnings on my tutorials, kind of a "head's up".  I am new to sewing (been sewing for about 3 months or so now), so I don't always have the sewing jargon down and a lot of my stuff is just eyeballing or guesstimating.  I wrote down my measurements and can tell you exactly how I made THIS dress, what I would change, etc.  I suggest reading through the entire tutorial before committing.  If you have a better way of doing it, by all means, go for it!  Like I said, I'm new and I make stuff up on the fly.

Supplies for dress WITHOUT chiffon underskirt  (yardage is applicable for size 2T dress.  Adjust accordingly for your sizing needs.)
1 yard main material  (they gave me an extra 2" on my "yard", so you may want to get 1 1/4 yd instead)
1/2 yard of material for trim
1/2 yard of material for lining
Large eyelets and Eyelet pliers
*Paint for eyelets if you want to customize them
*Clear, non-toxic matte finishing spray to seal  (I used Krylon Matte finish... love that stuff.)
Ribbon for corset back
No-fray so ribbon won't get ugly.  (I use a heat sealer.  Heat sealer, clear nail polish, or no-fray works fine.)
Matching thread for both main fabric and trim.
Disappearing ink marker for fabric
Buttons
Lace (about a foot)
Lightweight interfacing
Pattern paper or pattern fabric
Acrylic ruler
Rotary cutter


Step 1- Take your measurements.  You'll want to take a few.  Mine are in the parentheses.

Measurement A- Around the chest and back, right up under the armpits.  (20" I wrote mine at the bottom in the picture b/c I didn't want to scribble over my other measurements.)
 B- From armpit down torso to where you want the bodice to end  (6")
C- How far you want the arc to span across the chest (4.5")
D- How high you want the arc to rise  (0.5")

If you just want your bodice to be straight across with no arc, skip "C" and "D".


Draw out your bodice again so you can visualize your pattern.  I wanted to add a 1/2" seam allowance all the way around the edge, so I drew that in with a dotted line.  I would also add 1" or 1.5" to measurement A when you are making your pattern.  My dress fits without squeezing, but I really wish I'd made the bodice a bit looser so she could wear it longer.  As it is, I put it on her from the bottom, sliding it up.  It's snug, but she's going to outgrow it FAST.

Step 2-  Draw out your pattern.  Using your pattern paper, acrylic ruler, and a pen or pencil, draw out your pattern.  I opted to draw the bodice piece in half and cut it on the fold so I'd use up less paper and have less room for "oh poop" measuring mistakes.  KEEP your seam allowances in mind.  First, I drew a rectangle that was Measurement A (remember, you should add 0.5"- 0.75" [remember the extra 1- 1.5" I talked about in Step 1, you're cutting that in half b/c your pattern is half] extra inches for growing room so you'll get more enjoyment out of your dress) and added a 1/2" seam allowance to the end.  Then I put a mark where I wanted my arc to peak (Measurement D) and marked 1/2 of C from the fold.  I used a paint can to draw the arc.  Okay, I'm a visual person.  Here's what my pattern piece looked like.


I'm telling you, I hate math and was able to do it.  It looks scary, but it's easy.  I then cut the right edge of my pattern to allow for the corset room.  I cut about halfway up and 1/2" in.  You can see it in the next step.

Step 3-  Using your customized pattern piece, cut out one of your main fabric and one of your liner.  Remember to cut on the fold (fold on left in the next pic) so when you open it up, you've got an entire bodice piece.

Note the right edge where I cut a little bit out for the corset.  Didn't measure, just cut a small bit.

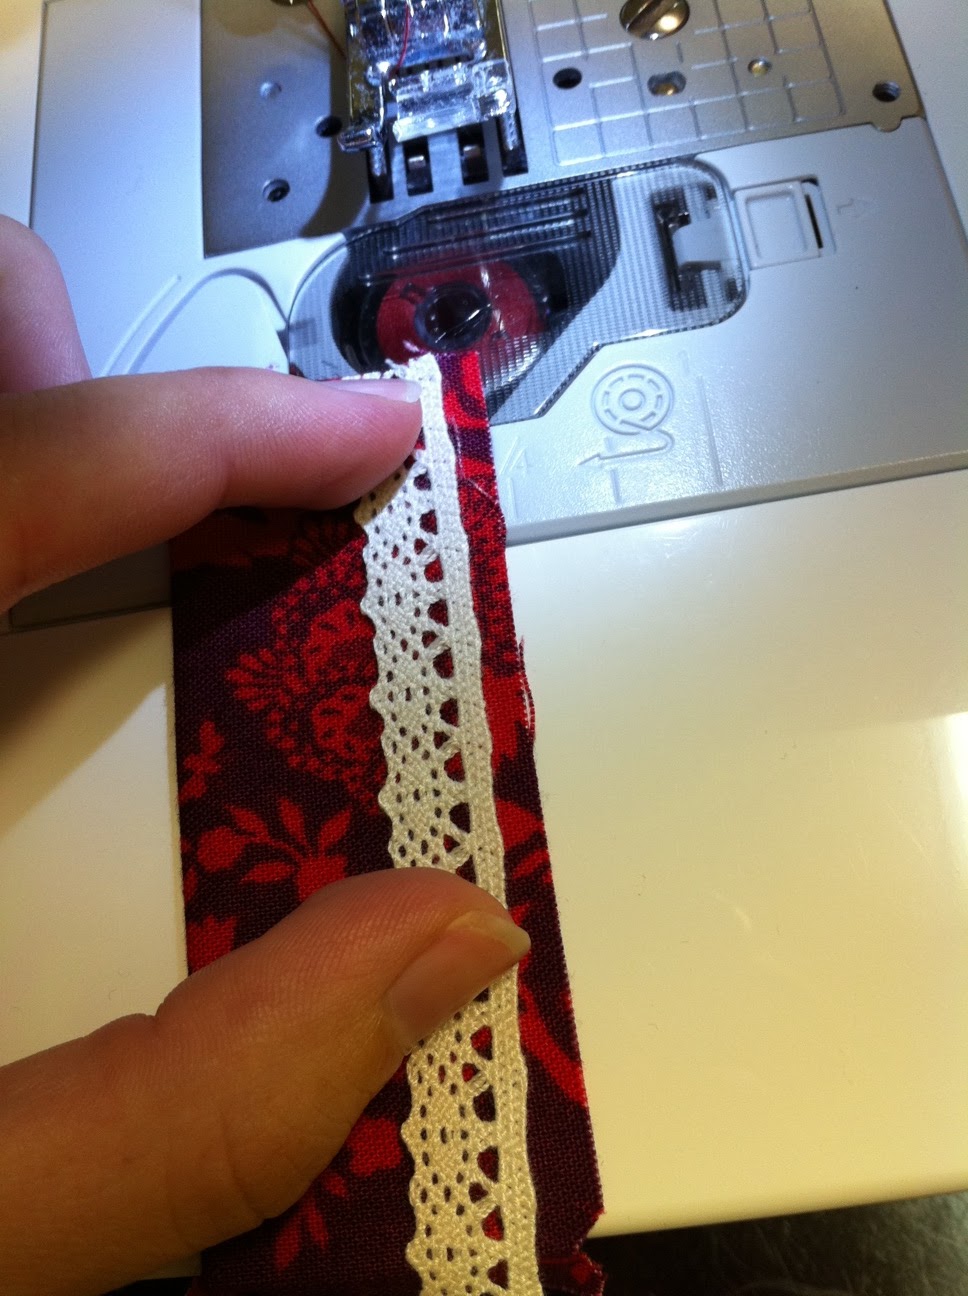
Step 4- Cut out a 1.5" x 3/5" piece of your trim material.  With right side down on ironing board, fold back both long sides and one short side (bottom) 1/4" and press.  This crease will help you position your lace.  Now, put your lace on top of the crease and sew, folding and mitering at the corners.  Sew down one long side, the bottom, and then up the other side.  No need to finish the last side, as that will be covered up with liner and ruffle soon. 
Step 5- Center lace trim piece on bodice, lining up raw edges and flipping creases under.  (You may have to press again, but be careful with your lace.  Don't burn it!!!)  Pin in place and sew as close to the edge as possible.

Now, measure 1/2" down (Remember, that's going to be seam allowance).  Measure remaining and divide it by how many buttons you have.  Or, just eyeball the button placement and go for it.  :)  Sew 'em on!

Step 6- Cut a strip that is 2" wide and 1.5 times measurement A.  Right sides together, press and sew both of the short ends. 

After pressing, sew down each of the short ends.
Now, flip it right side out.  Press again.


Run a gathering stitch 1/4" from the raw edge.  Gather and pin to the top of the bodice, be sure to spread the gathers evenly.

Baste 1/4" from raw edge.

Step 7- Lay lining piece on top of main piece, right sides together with ruffle sandwiched in the middle.  Pin and stitch 1/2" from raw edge.  Zigzag or overlock stitch the raw edges.  (I forgot to do that at this point and had to do it later.  Grr...)

Flip right side out and press... being careful with the buttons and lace. 

Step 8- Flip over and hold the short part of the lining piece right sides together.  Pin and sew ONLY the short side (1/2" seam), do not sew up the cut-out corset part.  Press open seam.  Repeat with short side of main fabric.


Step 9-  As I said, I'm new to sewing and maybe there's an easier way to do this, but I just cut out pieces of interfacing (This is only one, I cut four.  Two like this, two mirror images), and fused them to either side of the main fabric and the lining.  Follow the manufacturer's instructions for fusing.  I recommend making it a little bit (1/2" or so) wider for easier eyelet insertion.  This worked for me, but it was tight.
Step 10- Now is a good time to start painting and sealing your eyelets if you want them to have that "antique" look.  This was my first time working with eyelets, so I didn't realize they had two parts.  (I know, I know.  Duh, me.)  Be sure to paint BOTH sides.  I used antiquing paint that I found at Wal-Mart.  Waited for it to dry, then applied the sealer and waited for it to cure.  Apply the sealer in a well-ventilated area.  Outside is great, just watch where the wind is blowing.
Step 11- Using your trim material, cut a strip of bias 2" wide and long enough to go around the edge of your corset piece AND have room to fold the short edges in 1/2".  Fold and press the short edges in 1/2", then fold and press the bias tape in half, wrong sides together.  Open it back up, and fold the raw edges towards the middle fold.

     Now, you're ready to pin it to you bodice piece.  Pin the bias tape to the bodice piece and lining, making sure that the main bodice piece and lining's seams are matched.  Sew just a TAD less than 1/2" in from raw edge.

Flip the bias tape over, making sure to cover the line of stitching you just made.  Pin in place and stitch close to the edge... securing it at the start and finish by backtacking.

Step 12- Time for sleeves!  If you want to go easy and just do straps, that's perfectly awesome!  However, if you want to go all crazy and make convertible sleeves, get ready...

     I had two scraps of fabric that were 8" x 9.75".  Looking back, I wish I had used larger scraps so I could have turned the raw edges under instead of just overlock stitching them.  I would cut two pieces that are 8" x 11" at LEAST and work with that... you can always take material away.  :)

     I did these sleeves by just eyeballing.  Don't be afraid to give it a shot.  It's really not bad!  If you want to measure, that works too!

12a.) Working with right side of the fabric down, fold the long ends of your sleeve piece back 1/4".  Press.  Fold back another 1/4" and press so raw edges on the long side aren't visible.  Sew.  Repeat with other sleeve. 

12b.)  Flip over so right side is up.  (From here on out, it's easier to work on both sleeves at the same time.  Mirroring the side you're working on.)  Fold one long side back about 1/4" or so.  Press and sew smack dab on the folded edge.  Repeat with other sleeve, only mirrored.
12b
Sewing down the very edge (ignore the two seam lines to the left.  My machine messed up and I had to redo step 12a.

12c.)  With wrong side-down, fold material so it covers the edge line.  Press.  Repeat with other sleeve. 

12c
12d.) With right sides still up, Flip the edge of the fabric up and press it so the fold will be the same width as the other.  Stitch down the edge.  Repeat with other sleeve.
12d
12e.) Just like Step 12c.  Fold and press.  Repeat with other sleeve.

12e
12f.)  Repeat Step 12d. 
12f
Step 12g.) Repeat 12e.
12g
12h.)  Now you should have:
By hand, take the extra bit of fabric and semi-pleat it.  Just fold it back and forth a few times, matching the folds on both sides.  Pin in place.
Now, here's what I would have changed.  after sewing the bottoms of the sleeves, as such:
Sewed sleeve.  Pulled open.
If I had the extra length in mine that I recommended in the beginning, I would now roll the raw edges up 1/4" and then another and sew in place.  As it is, I had to overlock and make do.  Phlppptt!

Step 13- Pin sleeves in place (side that is pleated on inside, loose part to the outside).  Making sure the edges slightly pass 1/4" down onto the lining fabric.  Starting on right side of lacy button thing, lift up the lace and stitch (backtack one or two at the beginning and end, but don't sew over embellishment), 1/4" away from ruffle, all the way around the bodice and ending back at the lacy button thing.  When you hit the edges of the sleeves, backstitch over them, then forward stitch... continuing on your way.

Did not have sleeves pinned yet, was interrupted and forgot to take another picture.  :)  Your sleeves should be pinned on at this point.
Step 14- Cut a 10.5" x 37" piece of your main fabric for the bottom dress piece and a 2.5" x 37" piece of trim.  (Honestly, the 37" L was just because I wanted the pattern to line up.  I would take the length anywhere up to 2x Measurement "A" and not worry about it bunching all funky.) 

      Fold your trim piece in half, wrong sides together and press.  Then, place it right-side down and press the long edges 1/4" .  Pin to dress piece, right sides together.
Sew 1/4" from raw edge.

Step 15- Fold right sides together and pin side seam all the way down, including the trim.  Sew with a 1/2" seam allowance.  Then overlock stitch.

Step 16- Fold trim under, pin in place and stitch around.
Step 17- Baste around raw top edge of the dress piece, pull string to gather.  Spread gathers evenly and pin to bodice, right sides together.  Sew 1/2" from top edge and then overlock stitch the raw edges.

Step 18- (Run a few test runs on a scrap piece of fabric if you've never done eyelets before.)  If your eyelets are cured and dry, lay them on the bodice top and position them .  Use your fabric pen to mark the center of the eyelet.


Punch through the hole using your eyelet plier.
Insert deep end of eyelet and push through hole. 


Flip to inside and put shallow end of eyelet on.  Squeeze pliers.

Repeat for the rest of your eyelets.

Step 19- Thread your ribbon through and seal the ends so they don't fray. 
And you're done with that part!

The chiffon underskirt can be added to it for additional "oomph" if you want.... or it can be worn on its own.  Tutorial for the chiffon skirt can be found HERE.
Enjoy!